Author Archives: pfowler

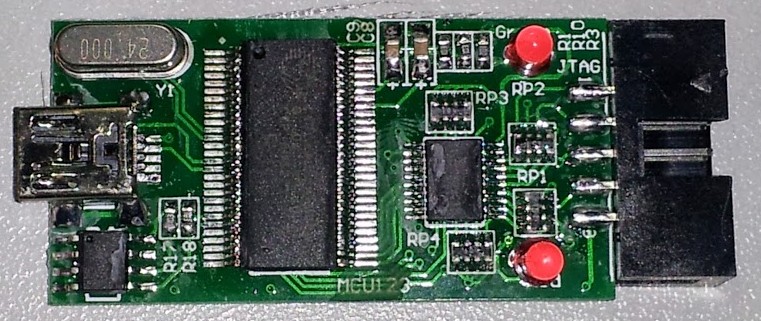
Geeetech FX2LP CY7C68013A USB DevBoard

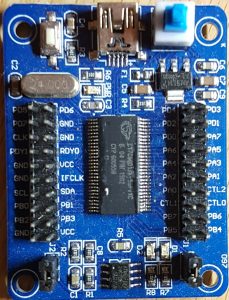
I recently purchased a Geeetech (clone/knockoff) off ebay for a small $5, and wanted to test its functionality for use with my Flight Sim devices. The CY7C68013A is the same chip used in the Salae logic analyzer (and ripoffs), so figured it should have pretty decent performance.

Despite being used in quite a number of logic analyzer type projects, I couldn’t find any decent beginner information for it, so this will try and fill the gap; especially for windows users.

This first part post will describe settings up the environment, and the second post will delve into the features of this dev board and chip.

The CY7C68013A

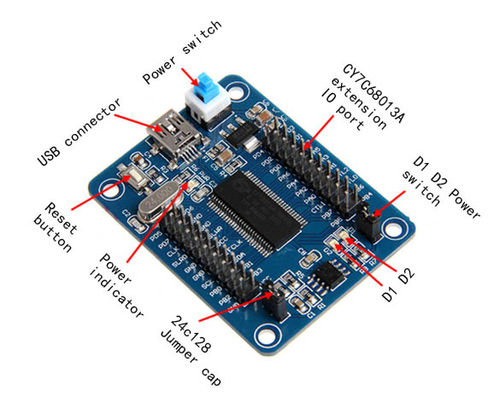
The chip board presents 20 GPIO ports (With 2 interrupt pins), a i2c bus, dedicated USB pins, and a couple of ancillary pins. Its work noting that the 56pin SSOP doesn’t have a serial port, which is a bit disappointing.

The board itself has 2 LEDS, D1 and D2 attached to the PA.0 and PA.1 ports respectively. This ties up both the interrupt pins, so will only be useful for initial testing.

Programming the chip is done via the EZ-USB software provided by Cypress (Or its open-source equivalent which only seems to be available on linux). The software can download a compiled .hex file directly to the RAM of the chip (Lost after reset), or the EEPROM provided and accessed via the i2c port. Data on the EEPROM will survive resets, but the chip must be disabled by adding J2 on the board before trying to reprogram it again.

Installing Software and Setting up Environment

  1. Install Cypress Dev Kit (CY3684Setup.exe)
    • Install inf file from C:\Cypress\USB\CY3684_EZ-USB_FX2LP_DVK\1.1\Drivers\Win8.1\x64 (Go into folder for your OS version, right click on inf file, click install)
  2. Install the CY7C68013 Dev Tools from fx2lp.exe
  3. Plug in the Device, driver will auto install
  4. Install sdcc
  5. Install make
  6. Install TortoiseSVN (Optional)
  7. Install  Eclipse (Install with C/C++ Development)
  8. Edit system path:
    • Run “C:\WINDOWS\System32\control.exe system”
    • Goto Advanved system settings -> Environment Variables
    • Edit ‘Path’; Add:
    • C:\Program Files\SDCC\bin
    • C:\Program Files (x86)\GnuWin32\bin
    • C:\Cypress\USB\bin

Setting Up Eclipse and Importing Code

The credit for ‘gtfx2lplib’ must all goto here: https://github.com/ubixum/fx2lib

I’ve taken the code base from there, removed whats not needed and modified it to suit the Geeetech dev board. I’ve renamed the library to ‘gtfx2lplib’

  1. Download gtfx2lplib.zip
    • Extract it somewhere
    • Most up to date source available from NewioIT WebSVN
  2. Import gtfx2lplib into Eclipse:
    • New -> Makefile project with existing code
    • Once import, create build targets ‘all’ and ‘clean’ (If they dont exist)
    • (Right click gtfx2lib, goto ‘Build Targets’ – Create; name one ‘all’, and one ‘clean’

Building Code and Deploying

Now we just have to build the code, and upload an example to the dev board. The below will write the code to the RAM, which will be lost after reset.

  1. Right click on the ‘all’ build target and build it
  2. Check the console to make sure everything compiled correctly
  3. Run CyConzole EZ-USB (Start menu or “C:\Cypress\USB\bin\CyConsole.exe EZ”
  4. Click on ‘Download’
  5. Goto examples\led\, select the led.hex file
  6. The file will be uploaded to the board, and the leds will start alternatively flash.

Led Code

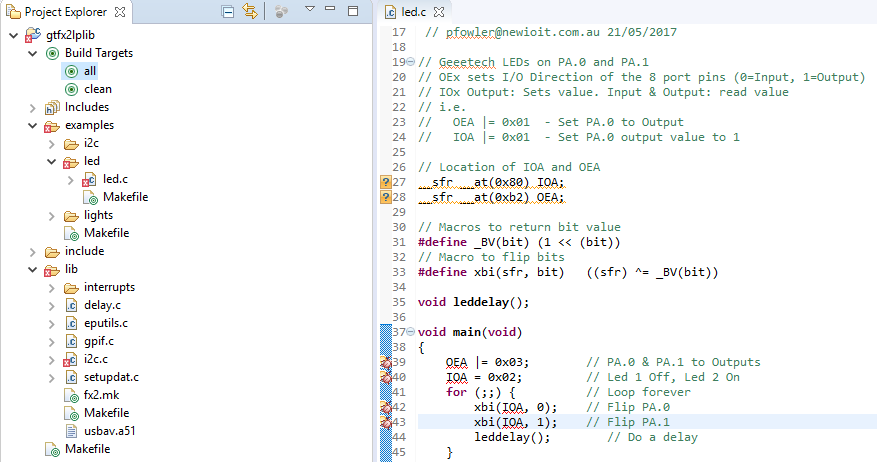
Here is the code use for the ‘leds’ example. It deliberately doesn’t use the gtfx2lplib files as to allow a base example of whats happening. There is also the ‘lights’ code, which uses the library itself to run its functions.

1
2
3
4
5
6
7
8
9
10
11
12
13
14
15
16
17
18
19
20
21
22
23
24
25
26
27
28
29
30
31
32
33
34
35
36
37
// Geeetech LEDs on PA.0 and PA.1
// OEx sets I/O Direction of the 8 port pins (0=Input, 1=Output)
// IOx Output: Sets value. Input & Output: read value
// i.e.
//   OEA |= 0x01  - Set PA.0 to Output
//   IOA |= 0x01  - Set PA.0 output value to 1
 
// Location of IOA and OEA
__sfr __at(0x80) IOA;
__sfr __at(0xb2) OEA;
 
// Macros to return bit value
#define _BV(bit) (1 << (bit))
// Macro to flip bits
#define xbi(sfr, bit)   ((sfr) ^= _BV(bit))
 
void leddelay();
 
void main(void)
{
    OEA |= 0x03;        // PA.0 & PA.1 to Outputs
    IOA = 0x02;         // Led 1 Off, Led 2 On
    for (;;) {          // Loop forever
        xbi(IOA, 0);    // Flip PA.0
        xbi(IOA, 1);    // Flip PA.1
        leddelay();     // Do a delay
    }
}
 
// Some code to provide a delay
void leddelay()
{
    int i = 0,k = 0;
    for(i = 0;i < 1000;i++) {
        for(k = 0;k < 100; )k++;
    }
}

Deploying to EEPROM

To keep your code int eh device beyond a power down or reset, the code needs to be deployed to the EEPROM. To do so:

  1. Ensure jumper J2 is in place
  2. Reset the device (power cycle or press reset button)
  3. Remove jumper J2, this will enable the EEPROM, but as the chips is powered, it won’t read its code from it)
  4. Open EZUSB (Start menu or “CyConsole.exe EZ”
  5. Click on the ‘Lg EEPROM’.
  6. Navigate to examples\leds, select leds.iic, click ok
  7. EZUSB will now copy the code to the EEPROM instead of RAM
  8. Once complete, press the reset button. Code will be loaded from EEPROM

The above procedure must be repeated each time you wish to program the EEPROM (i.e. replace the jumper, reset, remove jumper, program. I find it easier to do inital development work using just RAM, and then program the EEPROM with code when im ready to more production style testing.

Ebay Cheapies: Arduino Mega and 8×8 LED Matrix w/MAX7219 + ‘Saleae’ Logic Analyzer

 Ebay Cheapies 001

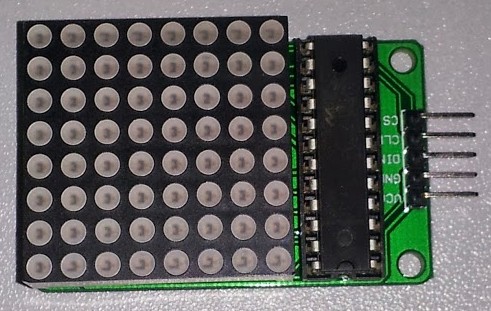
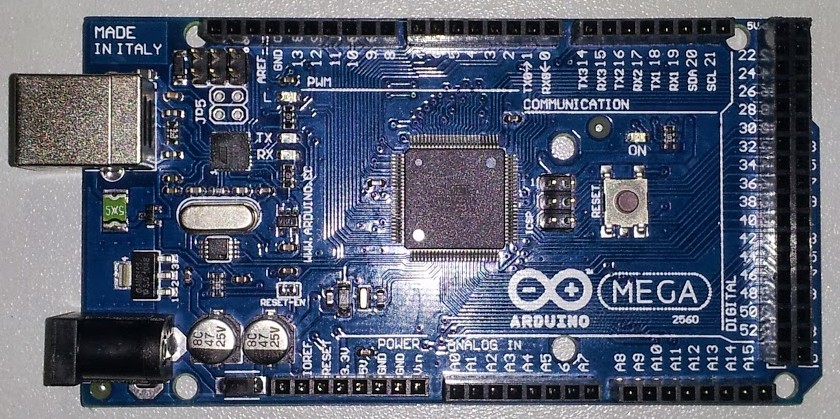
A couple of my ebay cheap buys have arrived. I have an Arduino Mega for $12, and a 8×8 LED Matrix with a (fake) MAX7219 driver for $3. To test them out, i’ve hooked them both up, and wrote some Arduino code to show what they can do.

I usually don’t use Arduino for Projects, but for testing out some parts it works great! Don’t even have to get my MKII programmer out fo the drawer.

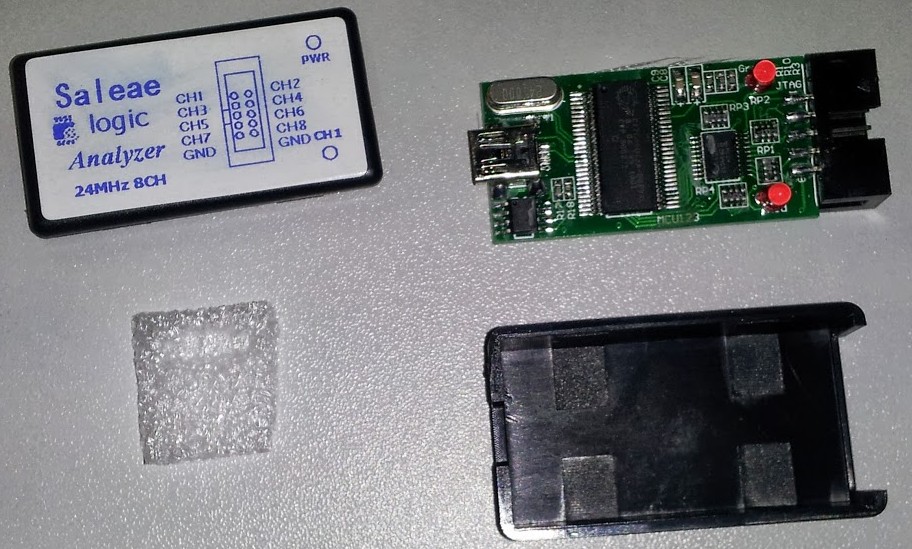
Also as a bonus, my knock off Saleae Logic Anayzler ($10) has arrived. I’ve used it to plot out the logic of shifting the data from the Arduino to the MAX7219.

Not much else to say here, so lets get into some pictures, code, and a video!

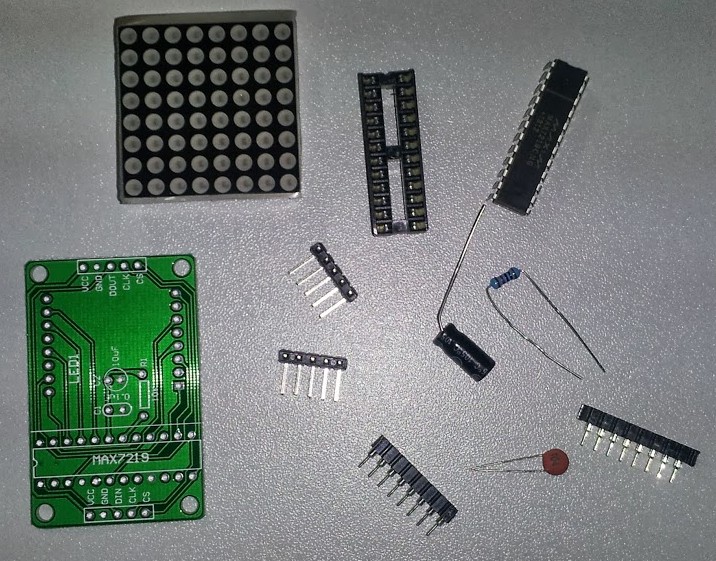
MAX7219 kit: Pretty simple setup here, the MAX7219 provides 3 data lines to the arduino, which allows the 8×8 matrix to set which leds are to be lit.

ledmatrix_partsledmatrix

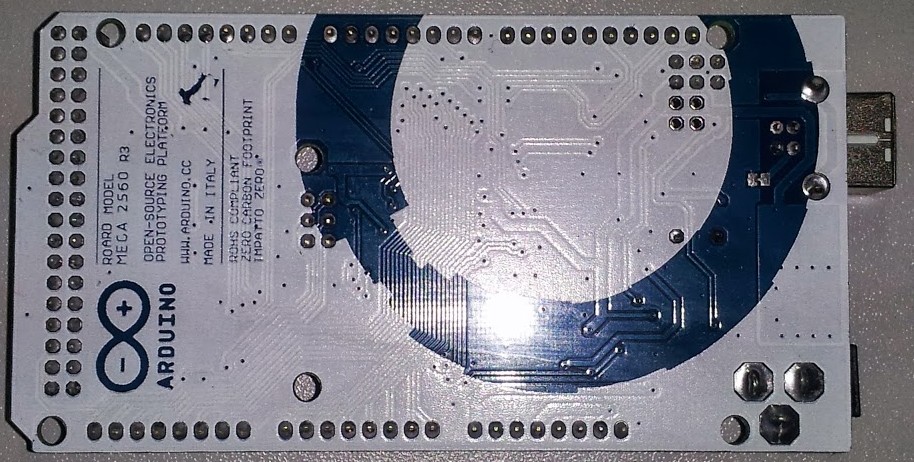
Arduino Mega: The back and front of the Arduino Mega. Amazing value at $10, considering the retail price of the non-clone is like $70. The only difference i could tell is the back of the PCB looks to say ‘ROARD’ instead of ‘BOARD’.

mega_frontmega_reverse

‘Saleae’ Logic Anazlyer: A $10 rip off of the Saleae system. Looks nothing like the quite refined Saleae logic, but does the job quite well. Uses the official software form Saleae. Read somewhere that this can be reconfigured to use the USBee software also, but havn’t had a chance to look at that yet.

saleae_clone03


saleae_clone02


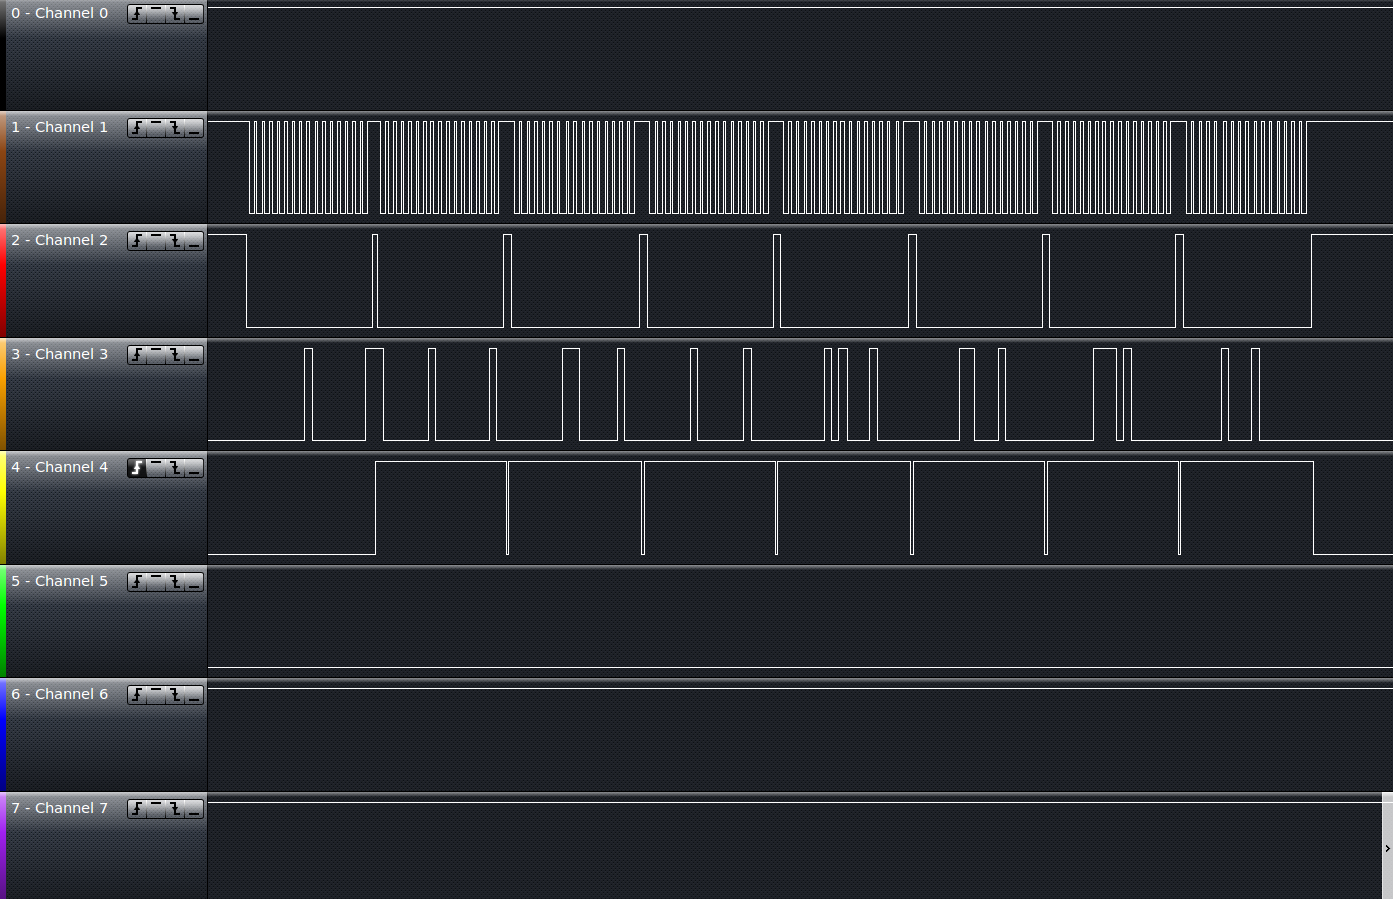
Here is a screen shot showing the analyzer in use, channel description:

  1. MAX7219 Clock line
  2. MAX7219 Load line
  3. MAX7219 Data line
  4. Custom line to show pushing out an entire 8×8 led update

saleae_logic

Here is the video showing a quick demostration of using the MAX7219 kit and the Arduino Mega


And finally, the code for doing this. The MAX7219 code has been ripped from the arduino.cc website. The rotary code is my own, which you can read more about in this post here. This will also work on a standard Arduino (clones available on the net form $8!)

You can also find the lastest version of this code on my SVN repo here.

** RECOMMEND using the above WebSVN link until i sort out my Syntax Highligter

1
2
3
4
5
6
7
8
9
10
11
12
13
14
15
16
17
18
19
20
21
22
23
24
25
26
27
28
29
30
31
32
33
34
35
36
37
38
39
40
41
42
43
44
45
46
47
48
49
50
51
52
53
54
55
56
57
58
59
60
61
62
63
64
65
66
67
68
69
70
71
72
73
74
75
76
77
78
79
80
81
82
83
84
85
86
87
88
89
90
91
92
93
94
95
96
97
98
99
100
101
102
103
104
105
106
107
108
109
110
111
112
113
114
115
116
117
118
119
120
121
122
123
124
125
126
127
128
129
130
131
132
133
134
135
136
137
138
139
140
141
142
143
144
145
146
147
148
149
150
151
152
153
154
155
156
157
158
159
160
161
162
163
164
165
166
167
168
169
170
171
172
173
174
175
176
177
178
179
180
181
182
183
184
185
186
187
188
189
190
191
192
193
194
195
196
197
198
199
200
201
202
203
204
205
206
207
208
209
210
211
212
213
214
215
216
217
218
219
220
221
222
223
224
225
226
227
228
229
230
231
232
233
234
235
#include <Encoder.h>
 
// Delays for certain events in ms
const int ROTARY_DELAY = 100;    // Time between checking for rotary turns
const int BUTTON_DELAY = 800;    // Button debouncing, and repeating
const int FLASH_DELAY = 600;     // How long to flash the entire row after button press
const int CURSOR_DELAY = 200;    // How quickly to flash the cursor led
 
// Pin Assignments
uint8_t rota = 2;
uint8_t rotb = 3;
uint8_t button = 4;
uint8_t dataIn = 5;
uint8_t load = 6;
uint8_t clock = 7;
uint8_t trigger = 12;
 
int maxInUse = 1; 
uint8_t x = 0;
 
byte max7219_reg_noop        = 0x00;
byte max7219_reg_digit0      = 0x01;
byte max7219_reg_digit1      = 0x02;
byte max7219_reg_digit2      = 0x03;
byte max7219_reg_digit3      = 0x04;
byte max7219_reg_digit4      = 0x05;
byte max7219_reg_digit5      = 0x06;
byte max7219_reg_digit6      = 0x07;
byte max7219_reg_digit7      = 0x08;
byte max7219_reg_decodeMode  = 0x09;
byte max7219_reg_intensity   = 0x0a;
byte max7219_reg_scanLimit   = 0x0b;
byte max7219_reg_shutdown    = 0x0c;
byte max7219_reg_displayTest = 0x0f;
 
 
Encoder knobLeft(rota, rotb);
 
 
char id=0;
 
void putByte(byte data) {
  byte i = 8;
  byte mask;
  while(i > 0) {
    mask = 0x01 << (i - 1);      // get bitmask
    digitalWrite( clock, LOW);   // tick
    if (data & mask){            // choose bit
      digitalWrite(dataIn, HIGH);// send 1
    }else{
      digitalWrite(dataIn, LOW); // send 0
    }
    digitalWrite(clock, HIGH);   // tock
    --i;                         // move to lesser bit
  }
}
 
void maxSingle( byte reg, byte col) {    
//maxSingle is the "easy"  function to use for a     //single max7219
 
  digitalWrite(load, LOW);       // begin    
  putByte(reg);                  // specify register
  putByte(col);//((data & 0x01) * 256) + data >> 1); // put data  
  digitalWrite(load, LOW);       // and load da shit
  digitalWrite(load,HIGH);
}
 
void maxAll (byte reg, byte col) {    // initialize  all  MAX7219's in the system
  int c = 0;
  digitalWrite(load, LOW);  // begin    
  for ( c =1; c<= maxInUse; c++) {
  putByte(reg);  // specify register
  putByte(col);//((data & 0x01) * 256) + data >> 1); // put data
    }
  digitalWrite(load, LOW);
  digitalWrite(load,HIGH);
}
 
void maxOne(byte maxNr, byte reg, byte col) {    
//maxOne is for adressing different MAX7219's,
//whilele having a couple of them cascaded
 
  int c = 0;
  digitalWrite(load, LOW);  // begin    
 
  for ( c = maxInUse; c > maxNr; c--) {
    putByte(0);    // means no operation
    putByte(0);    // means no operation
  }
 
  putByte(reg);  // specify register
  putByte(col);//((data & 0x01) * 256) + data >> 1); // put data
 
  for ( c =maxNr-1; c >= 1; c--) {
    putByte(0);    // means no operation
    putByte(0);    // means no operation
  }
 
  digitalWrite(load, LOW); // and load da shit
  digitalWrite(load,HIGH);
}
 
 
void setup () {
  pinMode(dataIn, OUTPUT);
  pinMode(clock,  OUTPUT);
  pinMode(load,   OUTPUT);
  pinMode(button, INPUT);
  pinMode(trigger, OUTPUT);
  digitalWrite(button, HIGH);
  digitalWrite(13, LOW);  
  digitalWrite(trigger, LOW);
 
  //initiation of the max 7219
  maxAll(max7219_reg_scanLimit, 0x07);      
  maxAll(max7219_reg_decodeMode, 0x00);  // using an led matrix (not digits)
  maxAll(max7219_reg_shutdown, 0x01);    // not in shutdown mode
  maxAll(max7219_reg_displayTest, 0x00); // no display test
  for (x=1; x<=8; x++) {    // empty registers, turn all LEDs off
    maxAll(x,0);
  }
  maxAll(max7219_reg_intensity, 0x01 & 0x0f);  // the first 0x0f is the value you can set range: 0x00 to 0x0f
 
}  
 
// Value to display a single LED on a row
uint8_t values[9] = {0, 1, 2, 4, 8, 16, 32, 64, 128};
// Array with all rows, indicating which 'value' to show
uint8_t line[8] = {0, 0, 0, 0, 0, 0, 0, 0}; 
// What row we are current working with
uint8_t idx = 0;
// Our delay counters (in ms)
int delayButton = 0;
int delayRotary = ROTARY_DELAY;
int delayFlash = 0;
int delayCursor = CURSOR_DELAY;
int cursorState = 0;
 
// Rotary position, reset after each loop
long pos = 0;
// Do we update the matrix this run?
uint8_t update = 1;
 
void loop () { 
 
  // Flash the row after a button press
  if (delayFlash && idx != 8) {
    maxSingle(idx+1, 255);
 
    if (delayFlash == 1) {
      maxSingle(idx+1, values[line[idx+1]]);
    }
 
    delayFlash--;
    if (delayButton) delayButton--;
 
    return;
  } 
 
  // Check for button press
  if (delayButton) delayButton--;
  if (!digitalRead(4) && delayButton == 0) { 
    if (idx == 8) 
      idx = 0;
     else
       idx++;
     delayButton = BUTTON_DELAY;
     delayFlash = FLASH_DELAY;
  }
 
 
  // Checks for rotary turning, and update
  //  the matrix buffer
  // My rotary encoder had '2 turns' per detent, making
  //  it awkward to move a single position. This is why
  //  the check is for > 1 and < -1 to make it a full detent.
  if (delayRotary) delayRotary--;
  if (delayRotary == 0 && idx != 8) {
    pos = knobLeft.read();
    if (pos > 1) {
      if (line[idx] != 0)
        line[idx]--;
      else
        line[idx] = 8;
      update = 1;
    } else if (pos < -1) {
      if (line[idx] != 8)
        line[idx]++;
      else
        line[idx]= 0;
      update = 1;
    }
 
    if (update) { 
      knobLeft.write(0);
      delayRotary = ROTARY_DELAY;
 
      if (pos) {
        cursorState = 1;
        delayCursor = CURSOR_DELAY;
      }
    }
  }
 
 
  // Toggle the state of the cursor after the
  //  cursor delay (in ms) has been reached
  if (delayCursor) delayCursor--; 
  if (delayCursor == 0 && idx != 8) {
    delayCursor = CURSOR_DELAY;
    cursorState = 1 - cursorState;
    update = 1; 
  }
 
  // Update the matrix only if a change has been made
  if (update) {
    for (x = 0; x<8; x++) {
       if (x == idx) {
         if (cursorState && line[x] != 0)
             maxSingle(x+1, values[line[x]]);
         else
             maxSingle(x+1, 0);
       } else {
         if (line[x] == 0) continue;
         digitalWrite(trigger, HIGH);
         maxSingle(x+1, values[line[x]]);
         digitalWrite(trigger, LOW);
       }
    }
    update = 0;
  }
 
  delay(1);
 
}

Project – Saitek Trim Wheel Internals Replacement

Downloads

Eagle Schematic

Source Code (91KB)

The above is stable code for this Project, but new features may be added in my SVN Repo.

Introduction

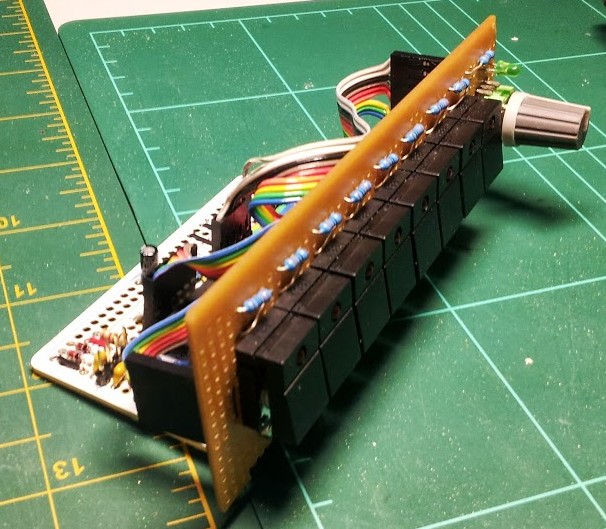
trimwheel_complete

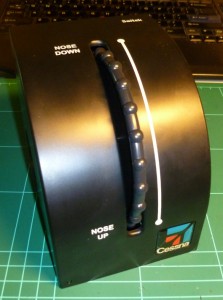
Over a year ago, I purchased a Saitek Cessna Trim Wheel to complement my Flight Simulator setup. At first it was a decent enough product, but over time took a number of USB resets to be recognised by Windows. Then not long after the warranty expired, it completely stopped being enumerated and would no longer work no matter what i tried. In stead of binning the device, and inspired my some of the mods that Tom at FSX Times gets up to; i decided to pop it open and see what i could do to repair it.

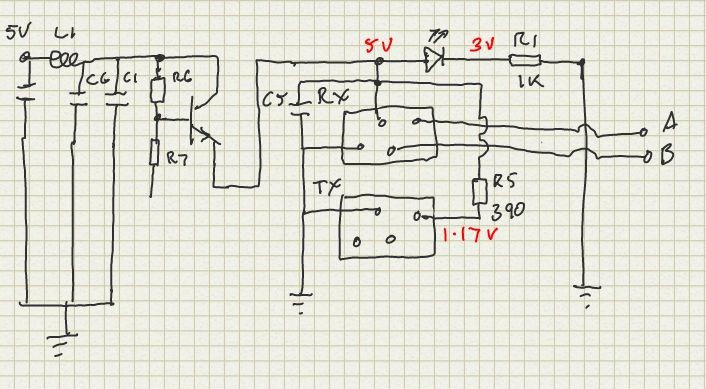
Inside, it turned out to be a fairly straight forward setup. I small MCU, connected to an optical rotary encoder, using a plastic disc with notches cut around the outside to provide the mechanism (which in turn was connected to the actual trim wheel). After tracing out PCB tacks to produce a rough circuit diagram, it was time to see if the issue was with the MCU, or the optical RX/TX components.

trimwheel_encoder_schematic

Rough sketch up the Saitek circuit

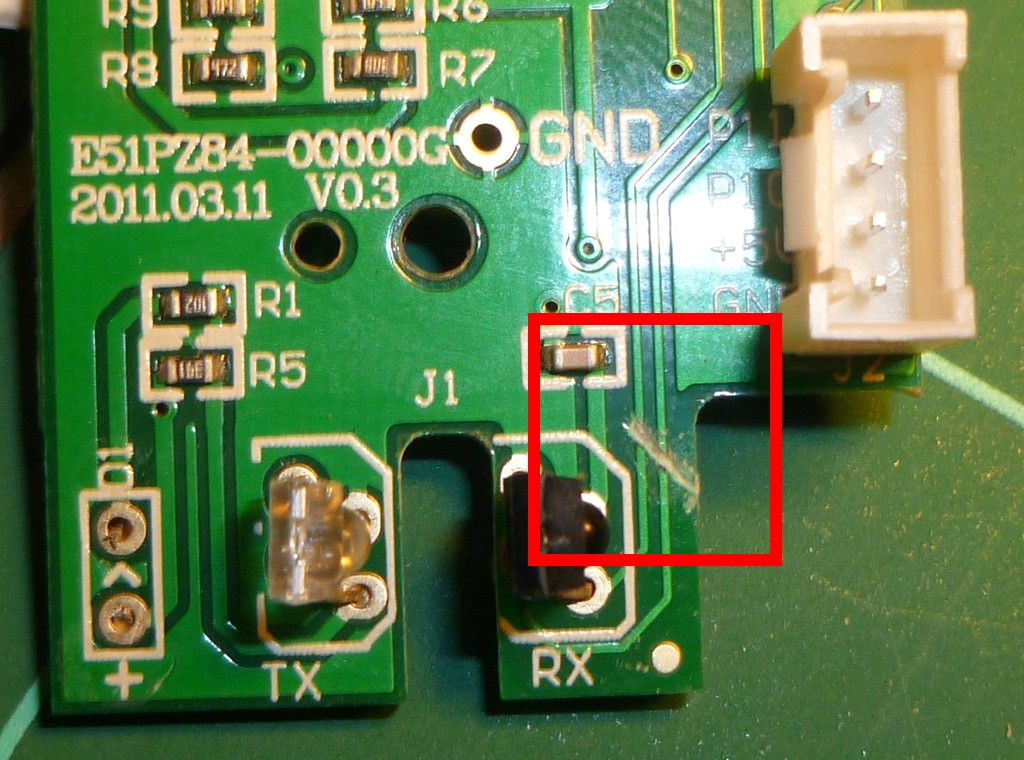
The TX part of the encoder looked like a standard IR emitter, given only two of the four pins where connected, and it was running at 1.17V (Down from 5V via the 390 ohm resistor). The Opto Encoder however required a little more research, as i had not heard of these devices. I ended up coming across the HLC2701 IR detector. Reading the specs on this made me smile, as it outputs in quadrature; something i had been working with very recently making life a little easier. Given that the entire device wasn’t registering within Window, i figured it meant that the MCU would need to be replaced with my own. This also meant working with a USB interface (Something i hadn’t really done up until this point).

trimwheel_board_test_cables

Two test wires soldered to the IR Detector

Skipping ahead a little bit, i decided to check the RX/TX part of the optical encoders. Being able to use those meant not having to create my own mounting hardware if by using the current board with mine piggy backed onto it. First up, I soldered a couple of wires to the output (A & B) of the RX IR detector. This allowed me to easily hook it up to my Bitscope, and within a couple turns on the Trim Wheel, was registering a quadrature output from the two signals. With these confirmations, it was time to think about how I could piggy back my own device onto the the optical encoder, and how to fit it in the casing.

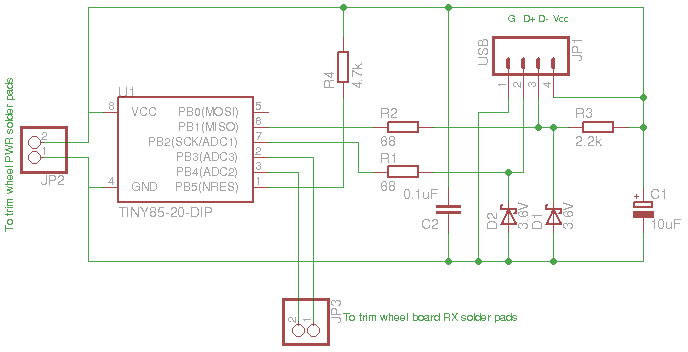
Being the impatient sort, i decided to whip up a test circuit circuit based on my Rotary Encoder Example. My biggest concern at the this point was trying to get the ATTiny85 to talk to Windows as a USB HID Joystick. The quicker i had a playground to start testing with, the better.

trimwheel_schematic


Testing the rotary encoder of the function was the quickest success I have had with any electrical project! The setup was receiving the quadrature output of the encoder on my first attempt, and re-invigorated me to pursue this hack.

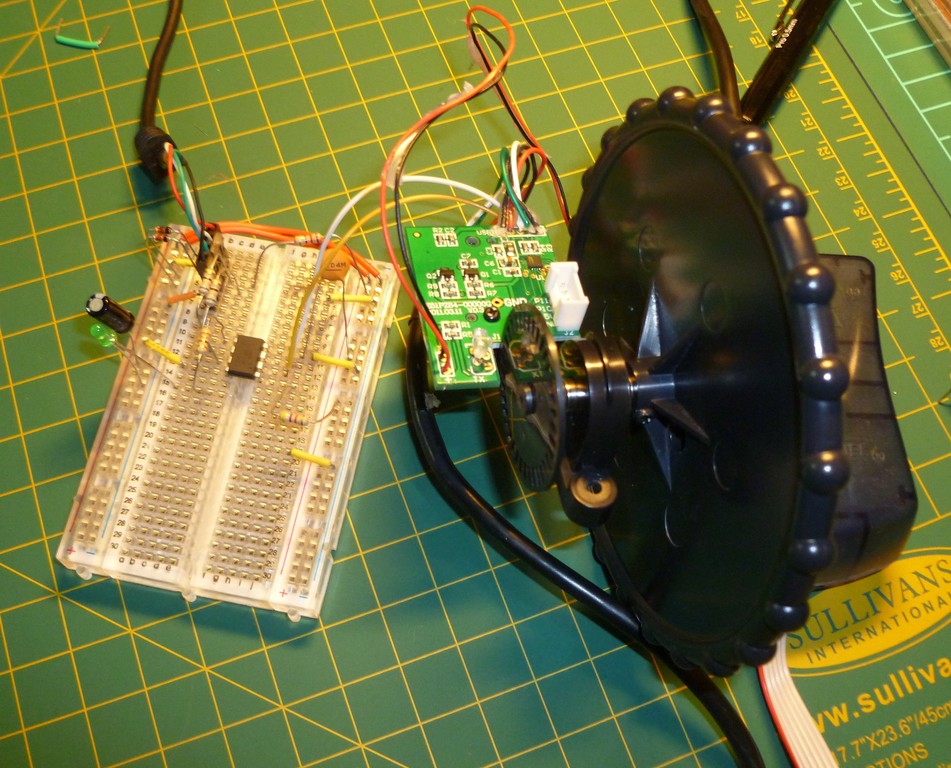
trimwheel_breadboard

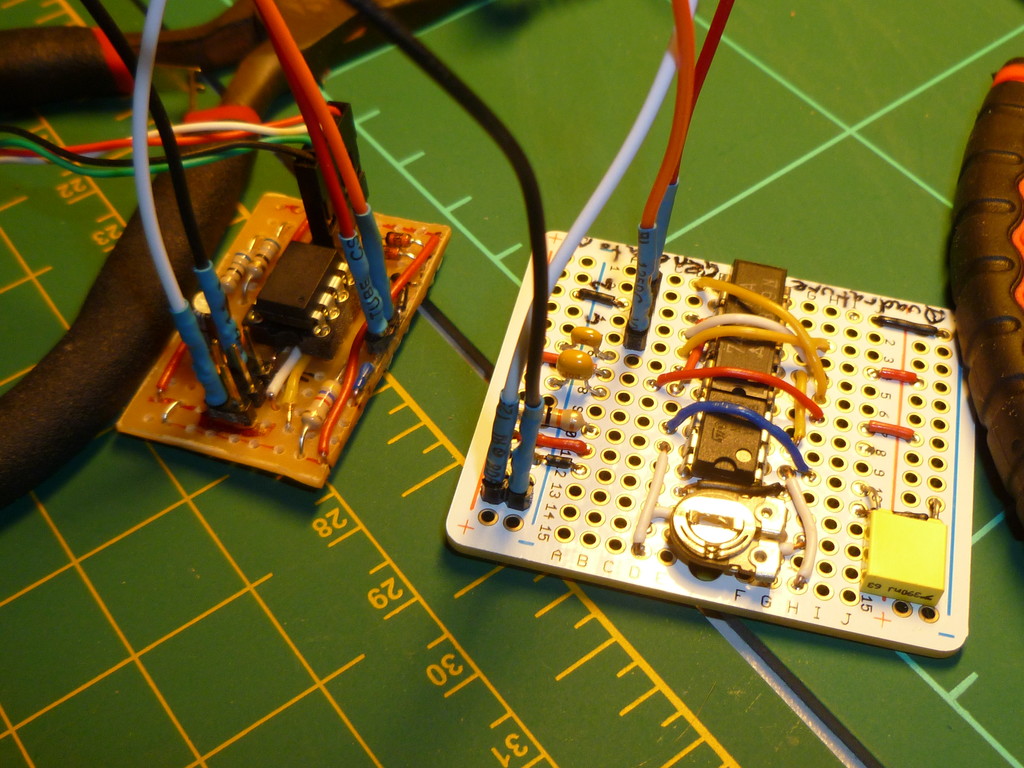
Breadboard circuit hooked up to the Trim Wheel test wires.

Next up was getting the circuit to talk to Windows! The original Saitek device talks to Windows via a Saitek propriety USB joystick driver. At this point, i didn’t know much about Windows USB drivers, so opted to use a Windows USB HID Joystick arrangement. This is essentially a descriptor file that lives on the USB device, that tells Windows what kind of data to expect, and what it means in terms of user input. This bypasses the need to a custom driver for every device (Mouses, Keyboards and generic joysticks all use this functionality).

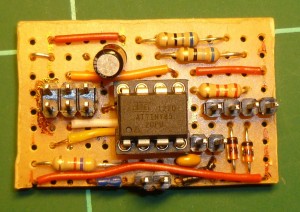
Replacement prototype

Replacement prototype

While researching USB HID and how this would work with an ATTin85 device, i came across the V-USB project. This is essentially a USB 1.1 all firmware library for AVR’s, that would seem to fit the bill perfectly. I also came across this project from Code and Life using V-USB that provides the entire base template for my project (Both schematic and code!). Without both of these sources, i doubt this project would have ever seen the light of day!

Fast forward through a lot of hacking and breaking things to get the HID descriptor working in Windows (And never plug a V-USB device into a USB3.0 hub, it just won’t work!), and I had a reasonably working replacement for the Saitek MCU.  The next few photo’s will show how to interface my replacement MCU with the Optical Encoder.

trimwheel_board_cut_tracks

The tracks between the RX pins and the MCU must be cut

trimwheel_board_solder_wires

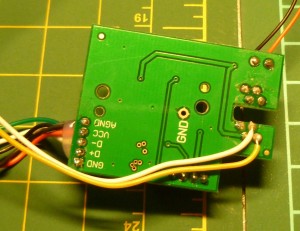
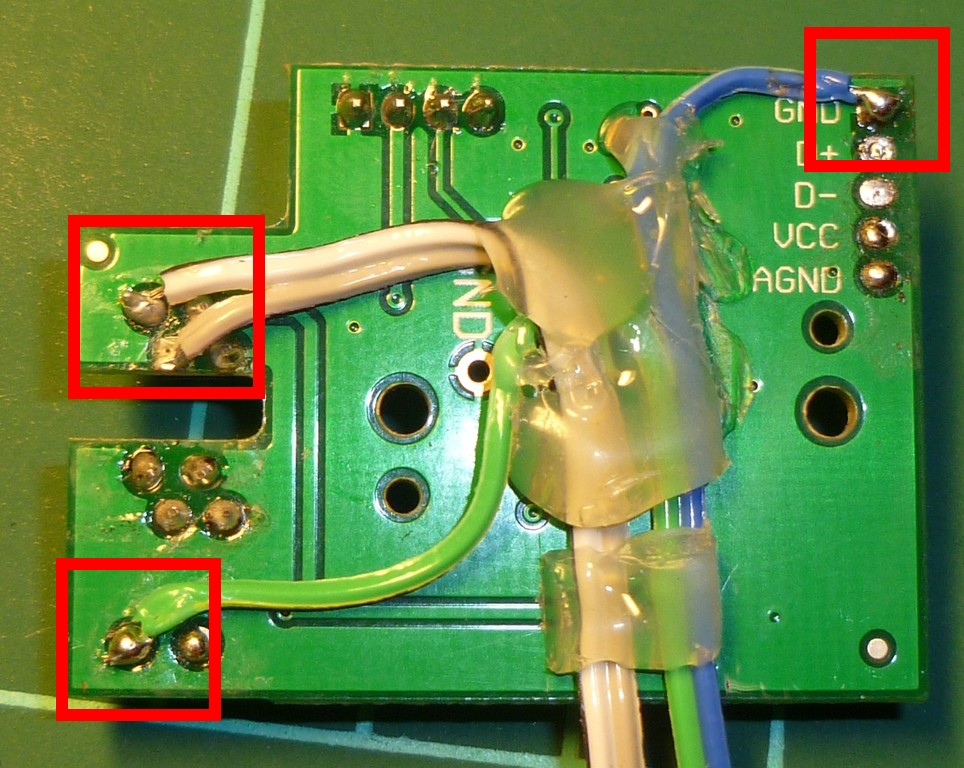
A & B output connections (White & Grey), Ground (Blue) and +5V (Green) connections.

trimwheel_proto_test_quadgen

Testing the board prior to installation

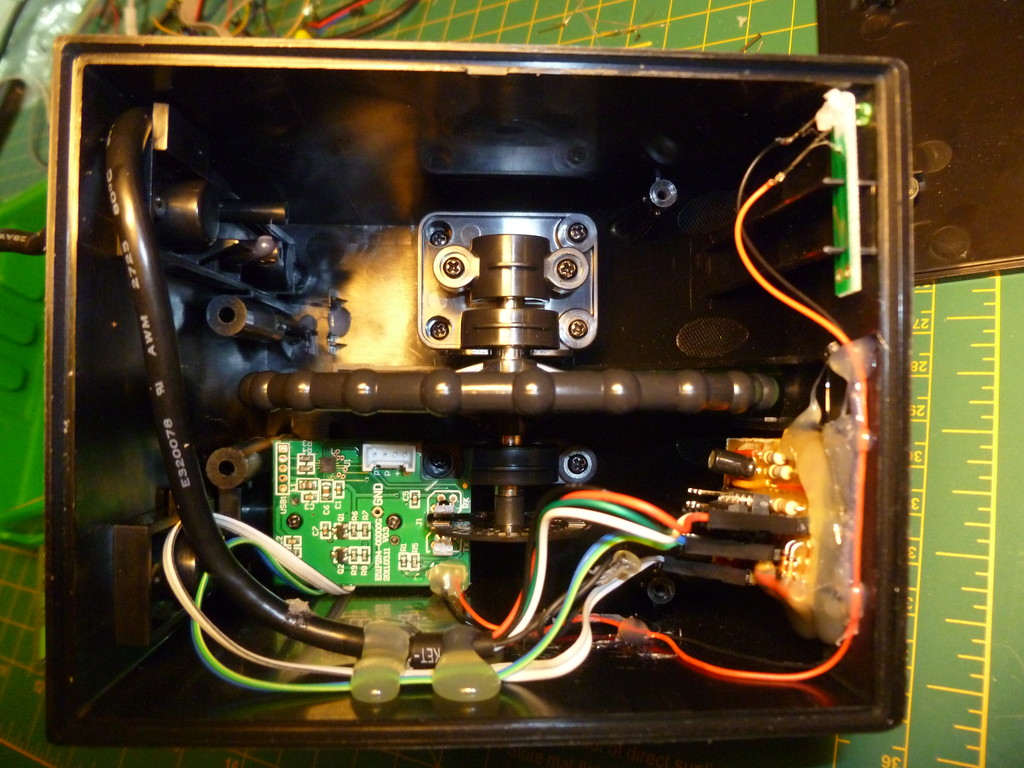
After some thorough speed testing using my Quadrature Generator module and some testing in FSX, it was time to mount the new board in the Trim Wheel case, and put the thing to work. Although I had soldered the wires directly to the Saitek MCU board, i decided to use pin heads on my proto board in case i wanted to swap it out for a different version later. This also made it much easier to mount my proto board in side the case, as i didn’t have to connect the cables until it was all glued in place. The below image shows my final placement for the board, and the oodles of hot glue I used to hold it in place.

trimwheel_mounting02

Todo: Insert picture of HID Joystick in Windows

Conclusion

This project enabled me to revive my Trim Wheel which other wise would have been thrown in the bin, saving me $60, with about $7 worth of parts. This also gave me the knowledge i needed to develop USB devices, and led me to work with FSX SimConnect to enable much richer devices, which i’ll post about in the future (Or see the sneak peak picture below).

My next version of the Trim Wheel will be tightly bound to FSX, instead of being a USB Joystick. This will allow me to pass back to the device the current location of the simulators trim wheel, removing the ‘absolute value’ issues that joysticks have. (Basically where the Trimwheel snaps back to its previous location prior to disabling Auto Pilot).

If there is anything I’ve left out here that you feel is needed to complete your own project, please let me know and i’ll update with greater detail.

commselector_sneak_peak

Sneak peak of my up coming FSX project: The Audio Comms Selector

Gallery of All Pictures For This Project

66_project_trimwheel

[img src=https://www.newioit.com.au/wp-content/flagallery/66_project_trimwheel/thumbs/thumbs_trimwheel_complete.jpg]21631
[img src=https://www.newioit.com.au/wp-content/flagallery/66_project_trimwheel/thumbs/thumbs_trimwheel_board_wheel_02.jpg]19080
[img src=https://www.newioit.com.au/wp-content/flagallery/66_project_trimwheel/thumbs/thumbs_trimwheel_board_wheel01.jpg]16830
[img src=https://www.newioit.com.au/wp-content/flagallery/66_project_trimwheel/thumbs/thumbs_trimwheel_encoder_schematic.jpg]15471
[img src=https://www.newioit.com.au/wp-content/flagallery/66_project_trimwheel/thumbs/thumbs_trimwheel_board_test_cables.jpg]14061
[img src=https://www.newioit.com.au/wp-content/flagallery/66_project_trimwheel/thumbs/thumbs_trimwheel_breadboard.jpg]13320
[img src=https://www.newioit.com.au/wp-content/flagallery/66_project_trimwheel/thumbs/thumbs_trimwheel_breadboard_closeup.jpg]12410
[img src=https://www.newioit.com.au/wp-content/flagallery/66_project_trimwheel/thumbs/thumbs_trimwheel_drawn_schematic.jpg]11820
[img src=https://www.newioit.com.au/wp-content/flagallery/66_project_trimwheel/thumbs/thumbs_trimwheel_schematic.png]11720
[img src=https://www.newioit.com.au/wp-content/flagallery/66_project_trimwheel/thumbs/thumbs_trimwheel_proto_being_built.jpg]10920
[img src=https://www.newioit.com.au/wp-content/flagallery/66_project_trimwheel/thumbs/thumbs_trimwheel_proto_finished.jpg]10380
[img src=https://www.newioit.com.au/wp-content/flagallery/66_project_trimwheel/thumbs/thumbs_trimwheel_proto_test_quadgen.jpg]9940
[img src=https://www.newioit.com.au/wp-content/flagallery/66_project_trimwheel/thumbs/thumbs_trimwheel_board_cut_tracks.jpg]9580
[img src=https://www.newioit.com.au/wp-content/flagallery/66_project_trimwheel/thumbs/thumbs_trimwheel_board_solder_wires.jpg]9230
[img src=https://www.newioit.com.au/wp-content/flagallery/66_project_trimwheel/thumbs/thumbs_trimwheel_usb_cable_conenctor.jpg]8950
[img src=https://www.newioit.com.au/wp-content/flagallery/66_project_trimwheel/thumbs/thumbs_trimwheel_mounting01.jpg]8800
[img src=https://www.newioit.com.au/wp-content/flagallery/66_project_trimwheel/thumbs/thumbs_trimwheel_mounting02.jpg]8551

Examples – Rotary Encoders using PCINT

Introduction

This example is about using Rotary Encoders with AVR chips. In provides a brief look at what they are, and how to use them.

While searching the web for how to use rotary encoders, I came across a number of tried methods. Nearly all of them though used the hardware interrupt pins on the chip though. As i use these primarily for USB, i could not spare them for a rotary coder (let alone if when i wanted to use multiple rotary encoders!). For this reason, i developed my own solution using the Pin Change Interrupts (PCINT). These are similar to hardware interrupts, but trigger when any of the Pins enabled to use PCINT change. It is then up to the developer to discover what pins actually changed, and what the changes are.

Rotary Encoders

As usual, Wikipedia has the best definition of a Rotary Encoder:

rotary encoder, also called a shaft encoder, is an electro-mechanical device that converts the angular position or motion of a shaft or axle to an analog or digital code.

Rotary Encoders come in many shapes, forms and output types. The simpliest rotary coder looks like a potentiometer, but is continually turnable. Other have dual shafts (or two inputs), and can come with switches in built (depresses the rotary encoder closed the circuit). Some are made to be connected to large machinery and turned via engines and what not.

The ‘analog or digital code’ describes how the rotary encoder actually encodes the information we have received via input into the rotary coders (i.e. turning the encoder). The type of output we are interested in for this example are those that output in ‘Quadrature’.

Quadrature is two signal that is 90 degrees out of phase with each other. That means that the direction of the turn can be indicated by which of the signals changed first (and the 2nd confirming the turn). The angular speed of the turn can also be indicated by the duration of the pulse. However, for this project, we are only going to look at which way the encoder is turning.

To learn more about quadrature, i suggest reading my previous post detailing how to make a Quadrature Generator.

Example Code and Schematic

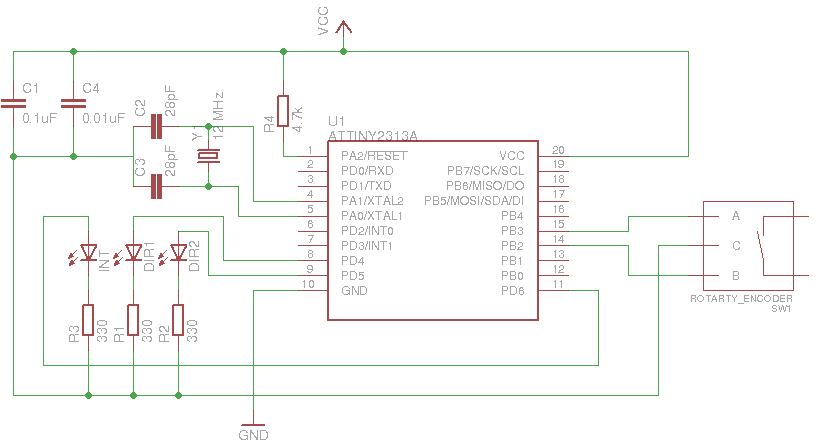
For this example, i’ve used the ATTiny2313 chip. Any AVR will do, but you will need to update the code with the correct ports to make it work with other variants (Even the ATMega’s). The 2313 series is a cheap chip for development, but with only 2K of program memory, it seriously limits what you can do with it (Even the newly released 4313 with 4K of PROGMEM is very limiting).

The example im showing here has the rotary encoder as the input, a 3 leds as outputs. The leds function like this:

  • LED1: Indicates the rotary encoder was turned in a direction.
  • LED2: Indicates the rotary encoder was turned in the opposite direction to LED1.
  • LED3: Indicates that an pin change interrupt has been received by the chip.

Rotary Encoder Schematic

Download: The Eagle schematic here

Below is the code for the example. This code can also be viewed on my SVN Repo. The avr-gcc Makefile is also available in the SVN repo.

1
2
3
4
5
6
7
8
9
10
11
12
13
14
15
16
17
18
19
20
21
22
23
24
25
26
27
28
29
30
31
32
33
34
35
36
37
38
39
40
41
42
43
44
45
46
47
48
49
50
51
52
53
54
55
56
57
58
59
60
61
62
63
64
65
66
67
68
69
70
71
72
73
74
75
76
77
78
79
80
81
82
83
84
85
86
87
88
89
#include <stdint.h>
#include <avr/pgmspace.h>
#include <avr/io.h>
#include <avr/interrupt.h>
#include <avr/wdt.h>
 
#define F_CPU 12000000
#include <util/delay.h>
 
#define DEPRESS_TIME    1
 
#define sbi(sfr, bit)   ((sfr) |= _BV(bit))             // Set bit 
#define cbi(sfr, bit)   ((sfr) &= ~(_BV(bit)))          // Clear bit
#define xbi(sfr, bit)   ((sfr) ^= _BV(bit))             // Flip bit
#define rbi(sfr, bit)   (((sfr) >> (bit)) & 0x01)
 
volatile uint8_t pcIntCurr = 0;
volatile uint8_t pcIntLast = 0;
volatile uint8_t pcIntMask = 0;
 
volatile uint8_t timer0_ovf = 0;
volatile uint8_t time_rot = 0;
 
void doInt();
 
int main() {
        cbi(DDRB, PCINT2);
        cbi(DDRB, PCINT3);
 
        TIMSK = (1<<TOIE0);                   // Eable timer overflow for Timer0
        TCNT0 = 0x00;                         // Set Timer0 to 0
        TCCR0B = (1<< CS02) | (1<<CS00);      // /1024 prescaler
 
        PORTB |= (( 1 << PCINT2 ) | ( 1 << PCINT3 )); //turn on pullups
        PCMSK |= (( 1 << PCINT2 ) | ( 1 << PCINT3 )); //enable encoder pins interrupt sources
        sei();
        GIMSK |= ( 1 << PCIE ); //enable pin change interupts
 
        DDRD |= ( 1 << PD4 );
        DDRD |= ( 1 << PD5 );
        DDRD |= ( 1 << PD6 );
 
        sbi(PORTD, PD6);
        _delay_ms(1000);
        cbi(PORTD, PD6);
 
        for (;;) {
 
                if (!time_rot) {
                        cbi(PORTD, PD4);
                        cbi(PORTD, PD5);
                }
 
                if (pcIntMask)
                        doInt();
        }
}
 
void doInt() {
  xbi(PORTD, PD6);
 
  if (rbi(pcIntCurr, PCINT2) == 0 && rbi(pcIntCurr, PCINT3) == 0 && rbi(pcIntMask, PCINT2) ) {
        cbi(PORTD, PD5);
        sbi(PORTD, PD4);
        time_rot = 5;
  } else if (rbi(pcIntCurr, PCINT3) == 0 && rbi(pcIntCurr, PCINT2) == 0 && rbi(pcIntMask, PCINT3) ) {
        cbi(PORTD, PD4);
        sbi(PORTD, PD5);
        time_rot = 5;
  }
 
  pcIntMask = 0;
}
 
ISR(TIMER0_OVF_vect) {
        timer0_ovf++;
 
        if (time_rot) {
                time_rot--;
        }
}
 
 
ISR(PCINT_vect)
{
  pcIntCurr = PINB;
  pcIntMask = pcIntCurr ^ pcIntLast;
  pcIntLast = pcIntCurr;
}

Conclusion

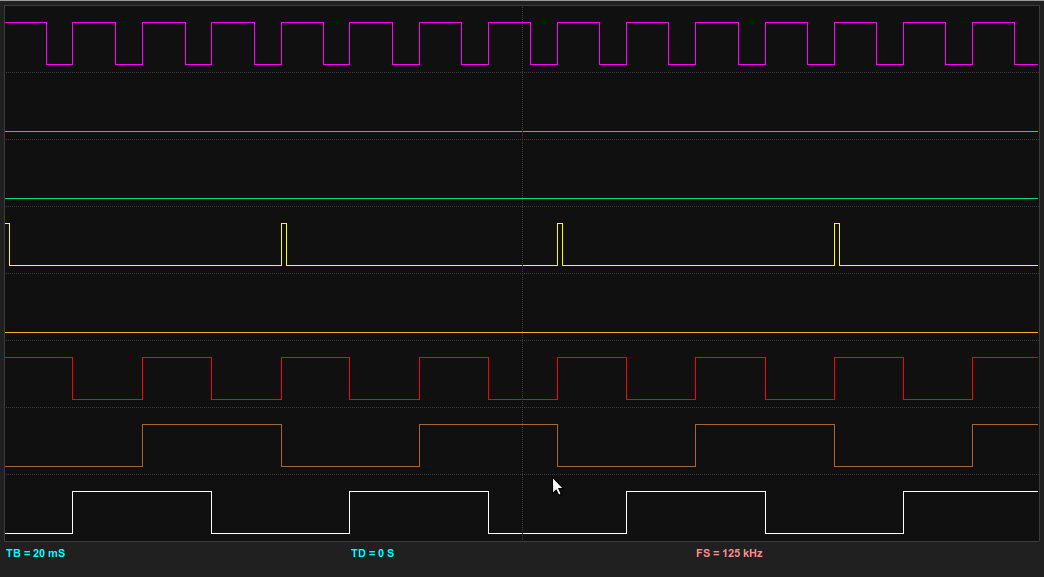
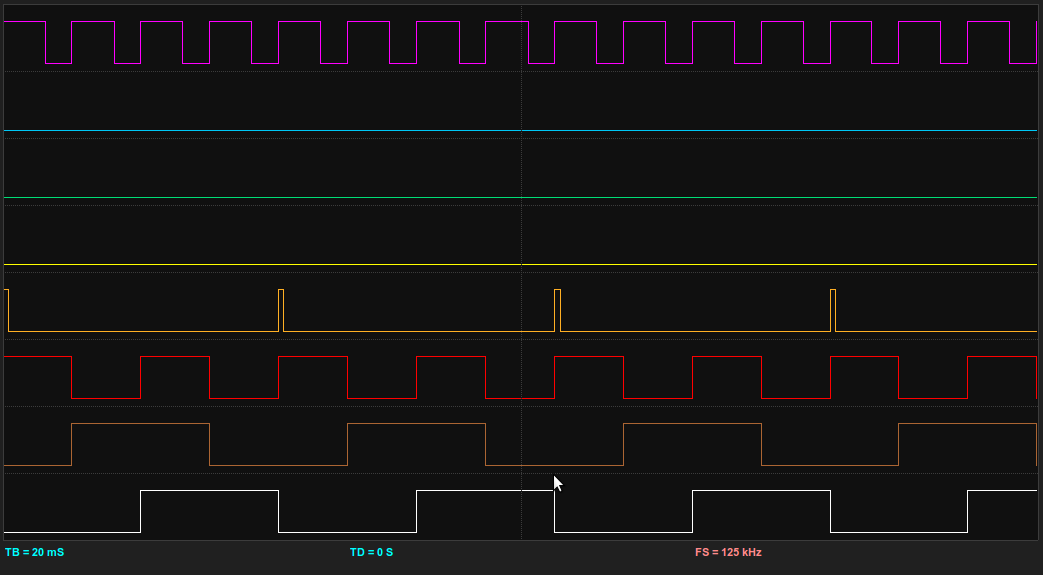
Here are the Bitscope Logic outputs dumps for the rotary being turned in either direction. This is actually using the Quadrature Generator to provide input. This is a great way to test the rotary code, and is also great for testing how fast the MCU can detect changes. The definition of each of the traces are:

  1. WHITE – Rotary Encoder A Input.
  2. BROWN – Rotary Encoder B Input.
  3. RED – Clock signal from the Quadrature Generator.
  4. ORANGE – A DIR2 turn event occurred.
  5. YELLOW – A DIR1 turn event occurred.
  6. PURPLE – A Pin Change Interrupt (PCINT) occurred.

Rotary Encoder direction 1

Rotary Encoder direction 2


Gallery of all images in this post:

Tutorials – 4MHz Colpitts Crystal Oscillator

Introduction

Colpitts Oscillator, with AY38910 PSG in background

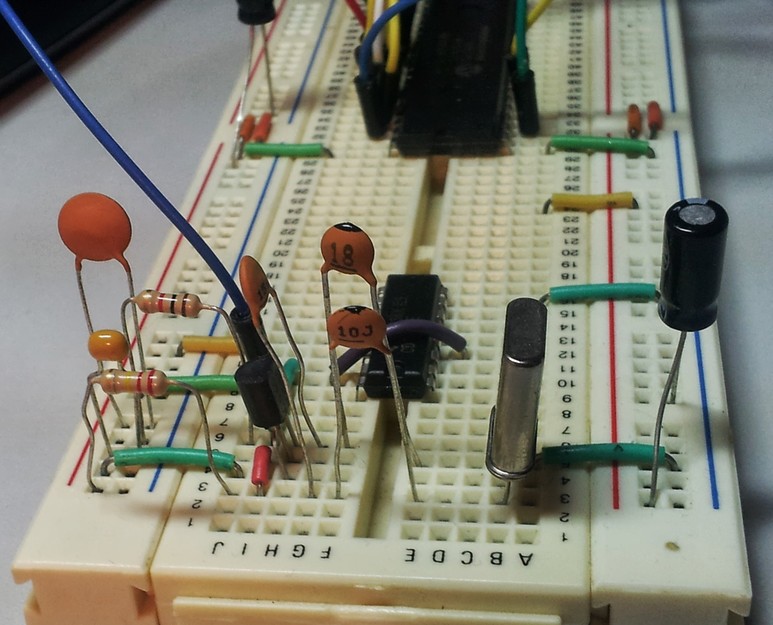
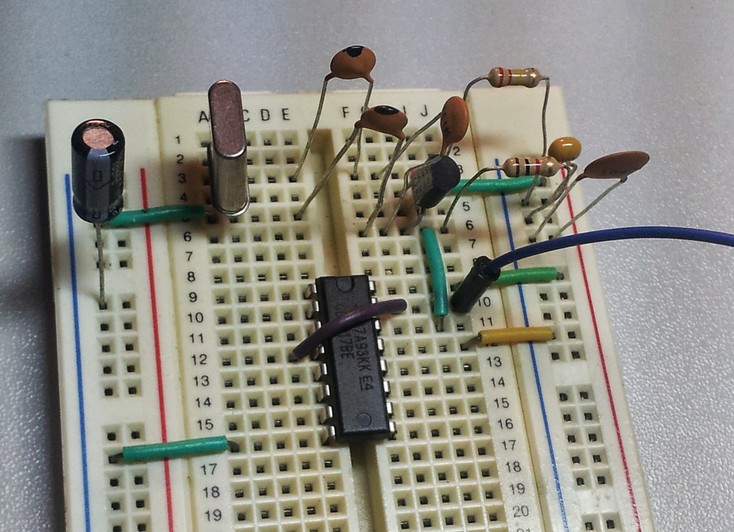
Clock sources are used in pretty much all digital electronics these days. There are many ways to create clock sources, from a simple 555 timers, to using a micro-controller (PIC, AVR) to output a clock source. I had a specific need for a 2MHz clock source to drive an AY38910 programmable sound generator chip I had ordered off ebay.

After looking through my surplus crystal, the lowest speed I could find was a 4Mhz crystal. Using that as a starting point, I went searching for how to quickly put it to use to get a stable and accurate signal. For this, i came across the Colpitts Oscillator.

Wikipedia describes the Colpitt Oscillator as:

A Colpitts oscillator, invented in 1918 by American engineer Edwin H. Colpitts, is one of a number of designs for LC oscillators, electronic oscillators that use a combination of inductors (L) and capacitors (C) to produce an oscillation at a certain frequency. The distinguishing feature of the Colpitts oscillator is that the feedback for the active device is taken from a voltage divider made of two capacitors in series across the inductor.

The Colpitts Oscillator Circuit

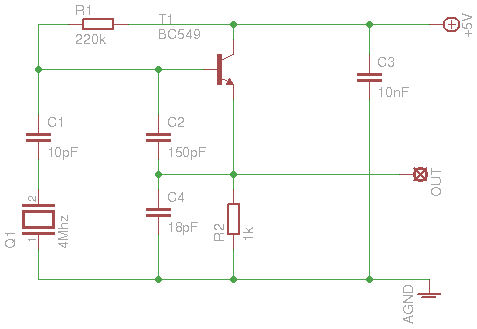
So after reviewing some circuit diagrams, and resistor/capacitor values, i came up with this circuit for generating a stable 4Mhz square wave.

4MHz Colpitts Oscillator

Download: The CADSoft Eagle schematic here

This all seemed to work pretty well. I pestered around with bumping up to 8Mhz, which worked with a bit of degradation on the amplitude of this signal. 12MHz had the output so low it wouldn’t drive TTL inputs. Given i was after a fairly low frequency, i didn’t investigate why i couldn’t get to higher speeds. The Colpitts Oscillator should be able to get up to about 20Mhz.

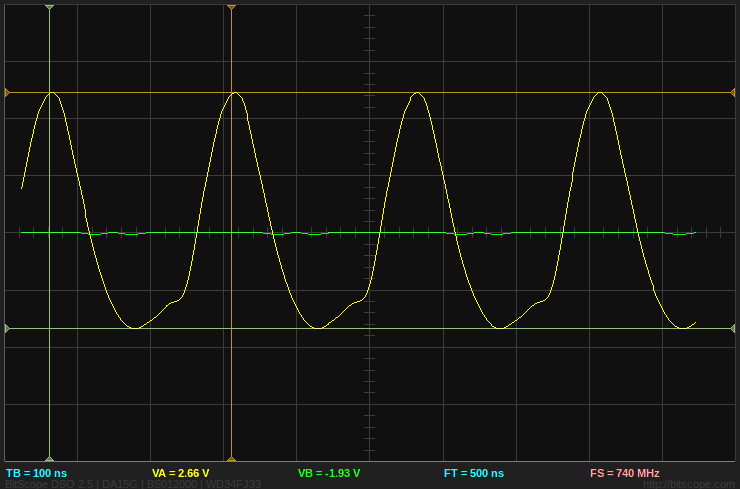
Its time to measure up the frequency of the output. I was a little annoyed at the latest update of the Bitscope DSO software. usually, the cursor frequency shows in the bar down the bottom, but now its in the left hand side bar… which isn’t included in the ‘save as image’ function.

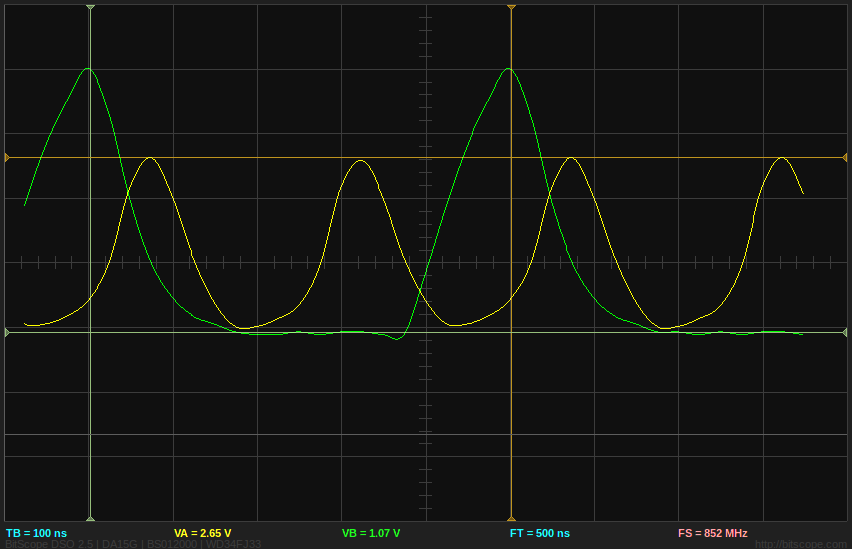
So here is the signal output on the oscilloscope. You’ll have to take my word for it that the cursor (Vertical lines) indicates a 4MHz something resembling a sine wave.

Colpitts Oscillator outputting a 4MHz signal

Creating a 2MHz Signal, with a CMOS 4017 Decade Counter

At the start of this post, you may remember saying that the AY38910 PSG required 2MHz (Or more correctly, between 1 and 2 MHz). You might also remember be saying that the lowest frequency crystal I had was 4MHz. All true. So the question now is how do I get the 4MHz output from the Colpitts Oscillator down to the 2MHz required by the PSG.

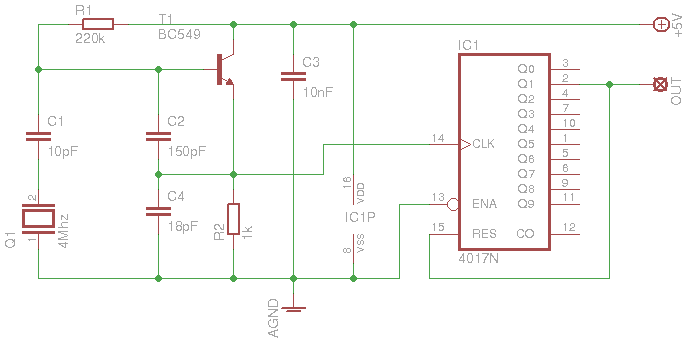
I searched around the net for a solution, and most seemed to revolve around using a J-K type Flip-Flop. Havnt not any of these in stock, I remembered an old trick used a while back: Using a CMOS 4017 decade counter with 2nd clock counter pin connected to the reset pin. Thus when the reset pin is triggered, that becomes your ‘divided by two’ output.

This can be used to divide to get all sorts of lower frequencies, i.e.

  • 4 / 2 = 2.00 MHz
  • 4 / 3 = 1.33 MHz
  • 4 / 4 = 1.00 MHz
  • 4 / 5 = 0.80 MHz
  • and so on…

So with the above in mind, I modified the 4 MHz Colpitts Oscillator to look like this:

Download The CADSoft Eagle schematic here

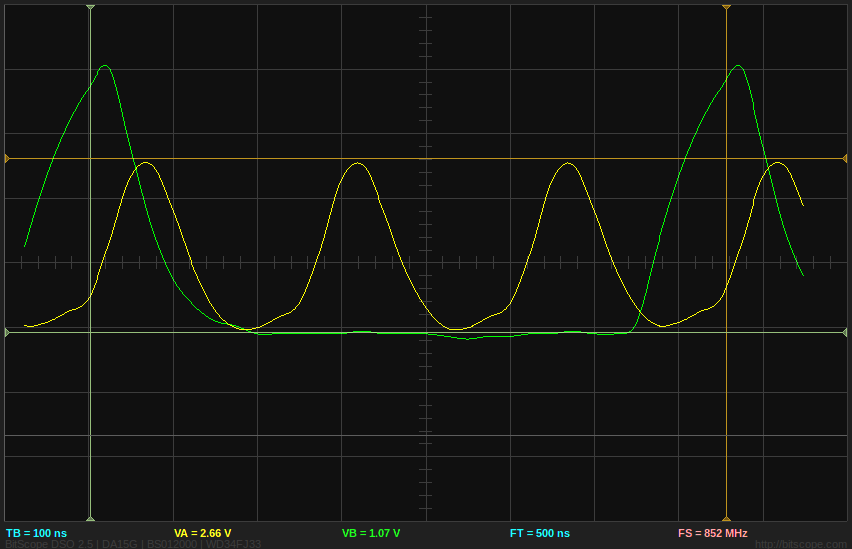
Using the CMOS chip had the added benefit of restoring the rather weak signal from the T1 transistor to the full 5V level (Im guessing this is due to the BC549 transistor’s base not being loaded to near saturation, if anyone can improve this, let me know!). The below oscilloscope screenie shows the yellow trace as the Colpitts output, and the green trace the output from the 4017. Once again you’ll have to take my word that the yellow is 4 MHz, and the green is 2 MHz.

And here is one more showing 1.33 MHz. I ended up using 1.33 MHz to clock the PSG, as the sound produced was a bit more crisp. It’s also the frequency that GIC use for their example circuits in the PSG Data Manual (The best source of info for the AY38910!)

Conclusion

The Colpitts driver is a nice way to generate a stable and accurate clock signal. Truth be told though, its probably much easier just to use a can resonator. It was a nice break from digital electronics though, i dont often get to use the oscilloscope part of my BitScope.

I’ll leave here with a sneak peak video of the Colpitts Oscillator clocking the AY38910 to play… the Overworld Mario Bros. theme song!!. This project will be published here in the next couple of weeks. Its using an arduino to program the PSG, which i’ll be replacing with a straight AtMega168 (I dont use arduino for finished projects).

And another picture of the Colpitts Oscillator driving the AY38910 PSG

Tutorials – Quadrature Generator

Introduction

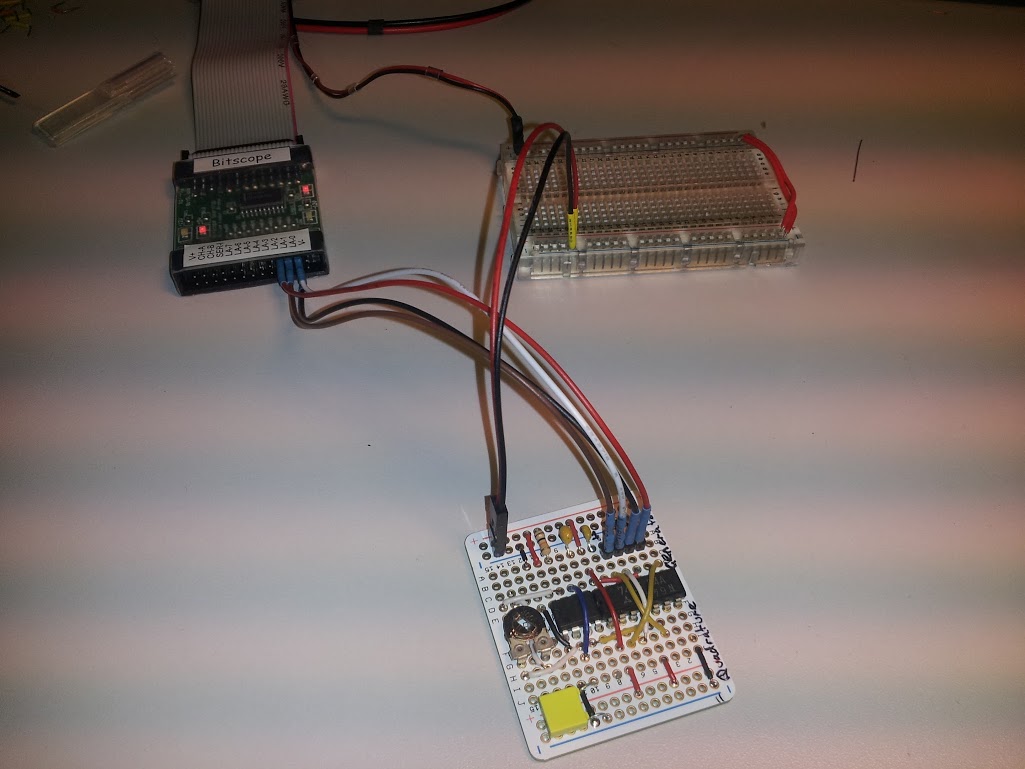
I’ve been doing quite a lot of work with rotary encoders lately. Testing the code of written for the AVR chips becomes quite a hassle when you need to turn a rotary encoder and just the right speed and duration to produce a good signal to debug against. I found this schematic somewhere on the web that automatically produces a quadrature signal. I’ve bumped it against a 555 timer with trimpot to make an adjustable timing for it.

For those that don’t know what a Quadrature Encoder is, its simply a device that outputs  two signals that are 90 degrees out of phase with each other.   WikiPedia has some decent information about quadrature, along with how they are used with rotary encoders. Briefly however, the below image shows how quadrature works. As a bonus, this is the actual output from the Quadrature Generator.

Output from the Quadrature Generator, captured on Bitscope Logic

The red trace it the clock input from the 555 timer, and the other two traces are is the quadrature. Notice they are 90 degress out of phase of each other, taking four clock cycles for a full rotation.

Schematic

So i must apologise for this schematic. I had it beautifully drawn on my Galaxy Note 10.1, but the Eagle component libraries have different pin locations then what I had used. So the net connections are all over the place. Hope the idea is there though…

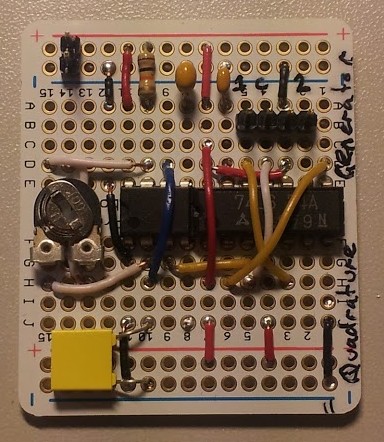
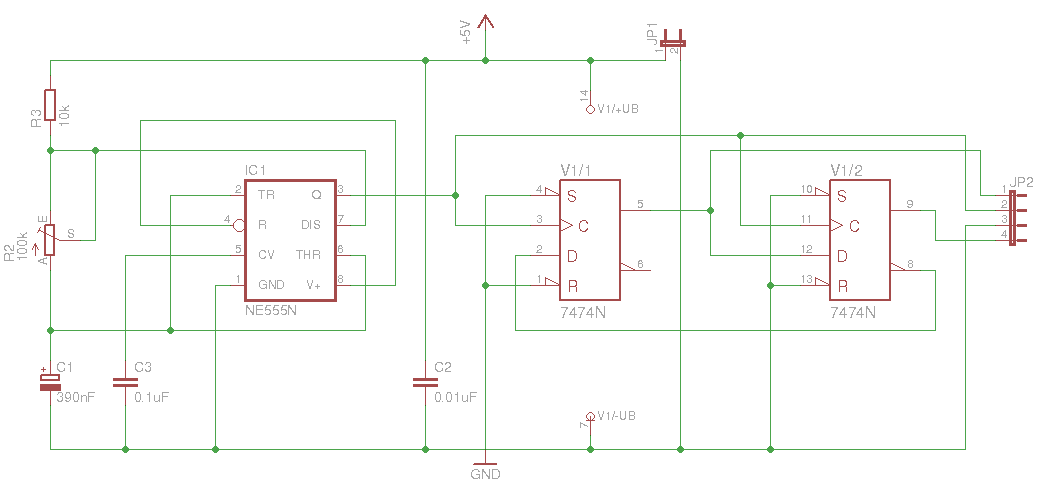
Schematic, Flip-Flop is a 74LS74, click for larger version

Download the Cadsoft Eagle schematic here

The 555 timer simply provides a variable clock source (By adjusting TrimPot R2) to the 74LS74 Dual D-type Flip-Flop.  The 4 way jumper provides an connection for the clock, output 1, output 2 and a ground connection (Making it easy to debug). The 2 way jumper is the +/- supply. The 74 series chips limits the Vcc to +5V, but replacing it with a CMOS 4013 flip flop will allow voltages up to around 15V (With a max speed of about 2Mhz).

Bill of Parts

  • 74LS74 Dual type Flip-Flop
  • NE555 Timer
  • 100k trimpot (I’ve used a horizontal mount type)
  • 10k 1/4W resistor
  • 390nF ceramic cap
  • 0.1uF electro cap
  • 0.01uF ceramic cap
  • 2 way jumper header
  • 4 way jumper header

Testing the output with the bitscope

PIC Tutorial – Part 01 – I2C

Introduction

This is the first part of a article on intercommunication between PIC chips with the I2C protocol. We will start with a basic example on using I2C send send and receive data on a 2-wire I2C bus, and then expand on this in later examples.

Included In This Tutorial

  • Source code for Master PIC16F84
  • Source code for Slave PIC16F88
  • Schematic to build the circuit

A PIC16F84 will be used for the master, and a PIC16F88 for the slave. Some simple bit-banging I2C code will be used to create the master, so it doesn’t really call for anything special on the chip end. In fact, i did initial develop for the code on a baseline range 16F509 chip!

The slave is a different beast however. The detecting of start/stop bit is a little more complex, at requires the use of some firmware built into the PIC16F88. The ‘SSP’ module can be used with interrupts to detect start and stop bits and process code based on these events.

Other chips, namely the PIC16F887 also comes with an ‘MSSP’ module that allows it to run as a master, completely automated. I might look at one of these in the future.

What is I2C

I2C is a serial communications bus created by Philips. Philips released there patent control over I2C around 2006, where is has found pretty decent usage in the micro controller world due to its simplicity. Competing transmission protocols are SPI and RS232.

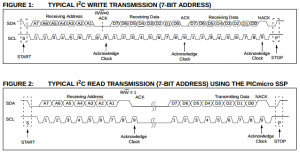
I2C uses two lines: SDC and SCL. These are joined between one or more micro controllers, generally with one operating as the master and the other as slaves. Both lines required a pull-up resistor attached to the 5+ bus. The PIC controllers then can control the lines simply by turning them into an INPUT (Which pulls the line low), and having them as an OUTPUT which forces the line high. This system allows either device to control the state of the line. I.e: If the slave requires more time to complete an operation, it can hold the clock line low. As the master won’t be able to bring the line high, it’ll keep polling until it can do so before trying to send anymore data.

For a deeper understanding of how the I2C protocol works, Wikipedia has a great article: I2C
i2c2

The Plan

The goal for Part 1 of this article is simple enough. There will be a I2C ‘Master’ (PIC16F84), and the I2C ‘Slave’ (PIC16F88). The Master will use some custom bit-banging code to send some data packets to the Slave which will then do some kind output to prove that it received the packet.

I was thinking an incrementing counter will be a nice bit of data to send. It’ll be easy to see on my logic analyzer to debug, is easily repeatable (it will roll over to 0x00 after 0xFF and continue on), and will be able to display some output easily by light a LED when the 8th bit is set. This will mean that any number after 0x80 will enable to LED, and when the counter rolls back over to 0x00, the LED will turn off.
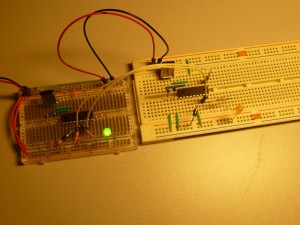
PIC I2C

The above image shows what we are trying to achieve after Part 1 of this tutorial. The left hand breadboard show’s the ‘Master’ PIC16F84, while the left has the ‘Slave’ PIC16F88. The LED on the master is active during a packet transmission, as this allow it to be used as a trigger by the logic analyzer. The ‘Slave’ LED will place when a transmitted byte is greater then 0x80 (i.e. its set to display the 8th bit of the byte).

The ‘Master’

The master is really just a bunch of bit-banging (modifying individual bits without too much overall complexity) that create the illusion of well timed operations. The code base listed below will pretty much serve the basis through all of these articles.

A ‘packet’ of I2C data consists of:

  1. A start bit
  2. A 7-bit address
  3. An Ack (Or Nack) from the slave
  4. An 8-bit data packet
  5. An Ack (Or Nack) from the slave
  6. Another data, followed by Ack OR
  7. A stop bit

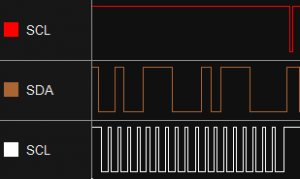
For the sake on simplicity, i’ll be leaving out step 6 for the meantime. Also, during the initial development, before a functioning ‘slave’ is up and running; it can be easier to leave out receiving a response from the slave. Just clock the SCL line while SDA is low and move on. This will also help us not having to detect the state of SCL.
i2c_single_packet

This image shows a single packet sent by the I2C master. The ‘Red’ line is the LED connected to the master which provides the trigger for the packets. The first drop is SDA, followed by SCL going low is the ‘Start’ bit. Each SCL ‘strobe’ then signifies a bit transmission, and finally when SCL, then SDA go high indicate the ‘Stop’ bit.

The bit traffic reads as 010011100010111000


Breaking this down we find:

  • Address 7-bits: 0100111 (0x27)
  • Mode 1-bit: 0 or Write Mode (1 is Read mode)
  • Ack 1-bit: 0 (Ack, 1 is Nack)
  • Data 8-bits: 01011100 (0x5c)
  • Ack 1-bit: 0 (Ack)

So we have a successful transmission of the byte 0x5c to the slave with address 0x27.

To put this to test, we are going to have the master run two main process:

  1. Each iteration of the main_loop, increment a variable. This variable will roll over to 0x00 once it reaches 0xFF
  2. Each iteration of the main_loop, send the variable across the wire to the slave

We will also have the main_loop test is the byte was successfully sent, and if not, to have it resent rather then out slave miss out on a number.

The Slave

Bit-banging methods may work fine for the master, but its not going to cut it on our slave device. It is very hard to detect start and stop bits measuring individual inputs and discrete timings. Luckily for us, Microchip provides built in ‘SSP’ modules for some of its chips. This was my main defining reason for using the PIC16F88; as it has one of these modules built right into the chip. The SSP module can only function as a slave, and even then there is quite a bit of code that requires this to work.

Other chips such as the PIC16F877 have an in-built ‘MSSP’ module, will are much more advanced. It allows for full master and slave functionality all built into the firmware. However, for our purposes the function of the PIC16F88 will suffice.

So far we have a master chip sending out packets as quick as it can to the slave. The slaves job is therefore easy. First, we set the address of the slave. The slave will listen for address packets that arrive along the I2C line. If the address doesn’t match its own, then it ignores the rest of the data all the way up until the stop bit. If it’s own address does match the one sent however, or it matches the ‘General Call’ (which has an address of 0x00), then the slave will jump to action.

For the purposes of Part 1 of this tutorial, we will just be accessing the 8th bit of any incoming data, and using the to either have the LED switched on or off. With the 8th bit being set on from 0x80 – 0xFF, and off from 0x00 – 0x79, we’ll end up with approx a 25% duty cycle. On a 4Mhz crystal, this will have the LED flashing at a decent pace.

The Circuit

Time it get into the grunt of it! As you can see from the first picture, I’ve built my circuit across two breadboards. If you want to follow my tutorials, do the same as we’ll be adding a latch to the slave board along with 8 LEDS, and at some point another large breadboard with a second slave.

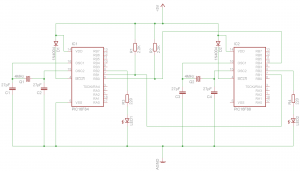
The test circuit here uses just a handful of components. The 16F88 could probably just use its own Internal 4MHz oscillator, but i havn’t got around to testing that yet. Also waiting on my 10 & 20MHz crystals to arrive so i can test out higher speeds! The stabilising capacitors are really needed, but i’ve got a whole draw full of 29pF ceramics just sitting there so added them anyway. I also need to research if one crystal can be shared between two micro’s.

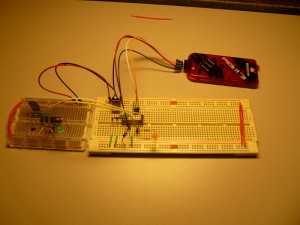
As every I2C forum will tell you, ensure the pull-up resistors are installed on the SDA and SCL lines. I’m using 2.2K 1/4W resistors in the picture, but 4.7K – 10K will probably work just as well. The diodes are there for when programming the chips using the PICKit 3. You can save a significant amount of time by programming the chips in circuit. Infact; while i was building the circuit, the PICKit3 was able to supply power reducing the need for another external power supply. The picture below shows the PICkit3 attached to the slave chip. To program the master, only the Vpp, PGA and PGC lines need to be relocated, making it a quick and easy solution.
pickit_iscp

Unlike the master, in which we can choose what pins to run SDA and SCL on, the PIC16F88 and dedicated pins to running the SSP module. Its also unfortunate that they sit right int he middle of the PORTB set of 8 outputs, but there are workarounds for this. I’ve also avoided using the PGD and PGC datalines to make ICSProgramming easier (We don’t have to put load resistors in place to protect the application circuit this way.

I’ve created the schematic for this circuit in EagleCAD. Its by far the easiest software i’ve used, over multisim and altium designer. It does have some drawback when created PCB’s, but for this task its worked well.
i2c_bus_schematic


Click the image for a larger version

Errata: I’ve missed a GND connection from PIN5 of the PIC16F88. Ensure you connect this to the GND line on the breadboard or not much of this circuit will work at all!

The Code

The code for this project will mature over time, so i’ll link into the subversion revision of the code used at the time of writing. This way as the code is developed over time, it’ll just be a simple matter of copying out the new version of code and programming the chip.

There are plenty of source out there on how to program a PIC chip, so i won’t go into that here (Or will perhaps write a separate article in future on how to do so.

The master code borrows heavily from the work of Phanderson. The code has mostly been written to clean it up a little, but the basis of how it works is all the same. Phanseron’s tutorial includes an example of using a port expander, something i will be covering in a later tutorial.

Click here to view the ‘Master’ code in WebSVN.

The slave code is based on the Microchip AN734 specification. This is referenced here and includes a lot of detail about implementing SSP on the PIC16F88, its pretty much a required read. The code needed a few tweaks, such as clearing the ANSEL analogue lines, setting with SDA and SCL lines as inuts and a couple of other changes.

Click here to view the ‘Slave’ code in WebSVN.

Testing

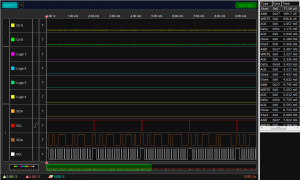
Any testing using logic levels over multiple wires is bet performed with a Logic Analyzer. I’m lucky enough to have a BitScope at hand, easily one of the most versatile instruments an amateur electrical engineer can have on hand! Using a bit scope to analyse data is as easy as connecting the data lines to the scope, selecting what type of protocol you want to analyse and clicking on ‘Run’. I also added an extra line to turn on a LED when a packet is being send, and turning off when its done. This allows this line to be set as a rising edge trigger on the scope, making capturing data a lot easier.

I’ve already shown a small snippet of the output (In the form of a single packet), but here is a screenshot from the BitScope Logic software:
i2c_bus_logic00

Click the image for a larger version

What Next

To ensure that every bit was actually being transmitted, i filled out the other 7 LED’s so that the whole Byte could be viewed. To actually see the LED’s moving i needed to change the Delay_Short in the master main_loop to a Delay_LongIt takes just over a minute to count up to 255.

If you want to build it yourself, here are the ports i attached the LED’s to. Each LED required its own 220-470Ω resistor:

LED# Port Pin
0 RA0 17
1 RA1 18
2 RA2 1
3 RA3 2
4 RA4 3
5 RB2 8
6 RB0 6
7 RB5 11

If you decide not to build these additions, i’ve uploaded a video of the circuit in action to YouTube: